Connect to Kubernetes API using Cloudflare Access
Published on: Sunday, June 1, 2025
Introduction
Exposing your Kubernetes API to the internet can be risky, yet remote access is often essential for developers and administrators. Traditional solutions like VPNs add complexity and don't scale well in modern, distributed environments.
Cloudflare Access offers a simpler, more secure alternative. By placing your Kubernetes API behind Cloudflare's Zero Trust platform,
you can control access using identity-based rules—without opening up your cluster to the public internet. In this post, we’ll walk through how to securely connect to your Kubernetes API using Cloudflare Access, enabling safe, authenticated access with minimal overhead.
This blog aims to provide a comprehensive guide for securing your Kubernetes API using Cloudflare Access. The official documentation for which is highly incomplete.
To make this guide reproducible, we will be using Terraform to deploy the necessary resources. But you can chose to do it manually should you like.
Prerequisites
In order to follow this blog post, you will need the following:
- A Kubernetes cluster. This guide is tailored for a Kubernetes cluster that is already set up and running. If you need help setting up a Kubernetes cluster, you can refer to my blog post on Achieving High Availability in MicroK8s with Terraform and Ansible.
- A Cloudflare account with Fully-setup DNS. To use Cloudflare Access, you need a domain managed by Cloudflare. This domain will be used to secure access to your Kubernetes API.
- (Optional) A working Keycloak instance for identity and access management. You can refer to my blog post on Self Managed IAM using Keycloak and Terraform for deploying a Keycloak instance within the cluster.
The Keycloak instance is optional but recommended for managing user identities and access policies. If you don't want the trouble of setting up Keycloak, you can use any OIDC provider like Okta, Auth0, Google, etc. As an alternative to configuring an identity provider, Cloudflare Zero Trust can send a One-Time Password (OTP) to your email address for authentication. For various Identity Providers (IdPs) supported by Cloudflare Access, refer to the Cloudflare documentation.
Overview
In this guide, we will cover the following steps:
- Generate Signed Kubernetes Cluster certificates for a custom domain.
- Create a Cloudflare Access Identity provider (IdP) for authenticating users.
- Create Cloudflare Access Policies
- Create Cloudflare Self Hosted Application for the Kubernetes API, and Deploy a Cloudflare Tunnel to securely expose the Kubernetes API (using the above resources).
Let's dive right in! 🚀
Step 1: Generate Signed Kubernetes Cluster Certificates
This step will differ based on the Kubernetes cluster you are using. The goal is to generate a signed certificate for your Kubernetes API server that matches the domain you will use with Cloudflare Access.
For example, if you wish to make your Kubernetes API server accessible at k8s.yourdomain.com, you need to generate a certificate for that domain.
In my case, I am using a MicroK8s cluster. My cluster is provisioned using Terraform with Ansible Provider as linked above,
hence I have setup a separate Playbook that performs the actions outlined in this documentation.
Feel free to make the necessary changes on your cluster manually if you'd like and/or follow documentation of your K8s Cluster Provisioner for the required steps to achieve this.
resource "ansible_playbook" "domain_addition" {
  depends_on = [
    ansible_playbook.join_cluster
  ]
  for_each   = var.cluster_operation == "create" ? { for host in ansible_group.k8s_cluster_group.children : host => host } : {}
  playbook   = "./playbooks/external-access.yml"
  name       = each.key
  replayable = false
  extra_vars = {
    custom_domain = var.custom_domain
  }
}
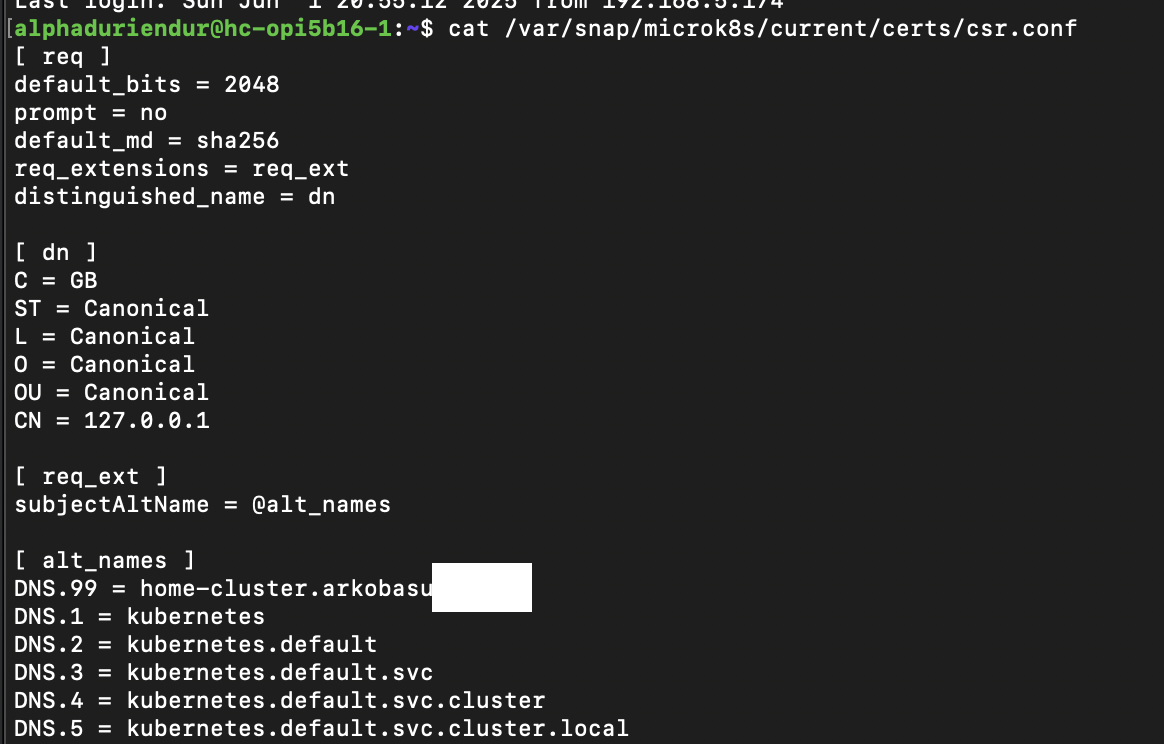
- name: Add domain to MicroK8s certs config and refresh cert
  hosts: all
  become: true
  vars:
    certs_template_path: "/var/snap/microk8s/current/certs/csr.conf.template"

  tasks:
    - name: Ensure domain DNS entry exists in csr.conf.template
      lineinfile:
        path: "{{ certs_template_path }}"
        insertafter: '^\[ *alt_names *\]'
        line: "DNS.99 = {{ custom_domain }}"
        state: present
        regexp: '^DNS\.99\s*=\s*{{ custom_domain }}'
        create: no

    - name: Refresh MicroK8s certificates
      command: sudo microk8s refresh-certs --cert server.crt
Step 2: Create a Cloudflare Access Identity provider (IdP) for authenticating users.
In this section we will provision a Cloudflare Access Identity Provider (IdP) for authenticating users. This IdP will be used to secure access to the Kubernetes API server.
You can use any Identity Provider (IdP) that is supported by Cloudflare Access, such as Keycloak, Okta, Auth0, Google, etc.
If you wish to setup Keycloak as your IdP, you can refer to my blog post on
Own Your Authentication: Self-Hosting an OIDC Client Using Keycloak for setting up a
Keycloak instance and an OIDC client within your Kubernetes cluster and securely exposing it with Cloudflare Tunnels without needing any Load Balancers or Ingress Controllers.
We will follow a module based structure so it is easier to reuse the code in other projects. The module will create a Cloudflare Access Identity Provider (IdP) for authenticating users.
terraform {
  required_providers {
    cloudflare = {
      source  = "cloudflare/cloudflare"
      version = "~> 4"
    }
    keycloak = {
      source  = "keycloak/keycloak"
      version = "5.0.0"
    }
  }
  required_version = "1.5.7"
}
variable "configuration" {
  description = "Configuration for the Cloudflare Identity Provider Keycloak module."
  type = object({
    zone_id            = string
    keycloak_realm_id  = string
    keycloak_client_id = string
    keycloak_url       = string
    name               = string
  })
}
data "keycloak_realm" "this" {
  realm = var.configuration.keycloak_realm_id
}

data "keycloak_openid_client" "this" {
  realm_id  = data.keycloak_realm.this.id
  client_id = var.configuration.keycloak_client_id
}
resource "cloudflare_zero_trust_access_identity_provider" "keycloak" {
  name    = var.configuration.name
  type    = "oidc"
  zone_id = var.configuration.zone_id
  config {
    client_id     = data.keycloak_openid_client.this.client_id
    client_secret = data.keycloak_openid_client.this.client_secret
    auth_url      = "https://${var.configuration.keycloak_url}/realms/${data.keycloak_realm.this.id}/protocol/openid-connect/auth"
    token_url     = "https://${var.configuration.keycloak_url}/realms/${data.keycloak_realm.this.id}/protocol/openid-connect/token"
    certs_url     = "https://${var.configuration.keycloak_url}/realms/${data.keycloak_realm.this.id}/protocol/openid-connect/certs"
    scopes = [
      "openid",
      "email",
      "profile",
      "groups",
    ]
    claims = ["groups"]
  }
}
output "configuration" {
  value = {
    id = cloudflare_zero_trust_access_identity_provider.keycloak.id
  }
}
With the module in place we can now use it to create a Cloudflare Access Identity Provider (IdP) for authenticating users.
terraform {
  required_providers {
    cloudflare = {
      source  = "cloudflare/cloudflare"
      version = "~> 4"
    }
    keycloak = {
      source  = "keycloak/keycloak"
      version = "5.0.0"
    }
  }
}

provider "cloudflare" {}

provider "keycloak" {
  client_id = "terraform"
  url       = <your-keycloak-url>
}

variable "cloudflare_default_configurations" {
  type = object({
    zone_id    = string
    account_id = string
    domain     = string
  })
  description = "values for the default cloudflare configurations"
  sensitive   = true
}
module "k8s_api_identity_provider" {
  source = "../modules/cloudflare/identity-provider-keycloak"
  configuration = {
    zone_id            = var.cloudflare_default_configurations_personal.zone_id
    keycloak_realm_id  = "<your-keycloak-realm-id>"
    keycloak_client_id = "<your-keycloak-client-id>"
    keycloak_url       = "<your-keycloak-url>"
    name               = "K8s API Identity Provider"
  }
}
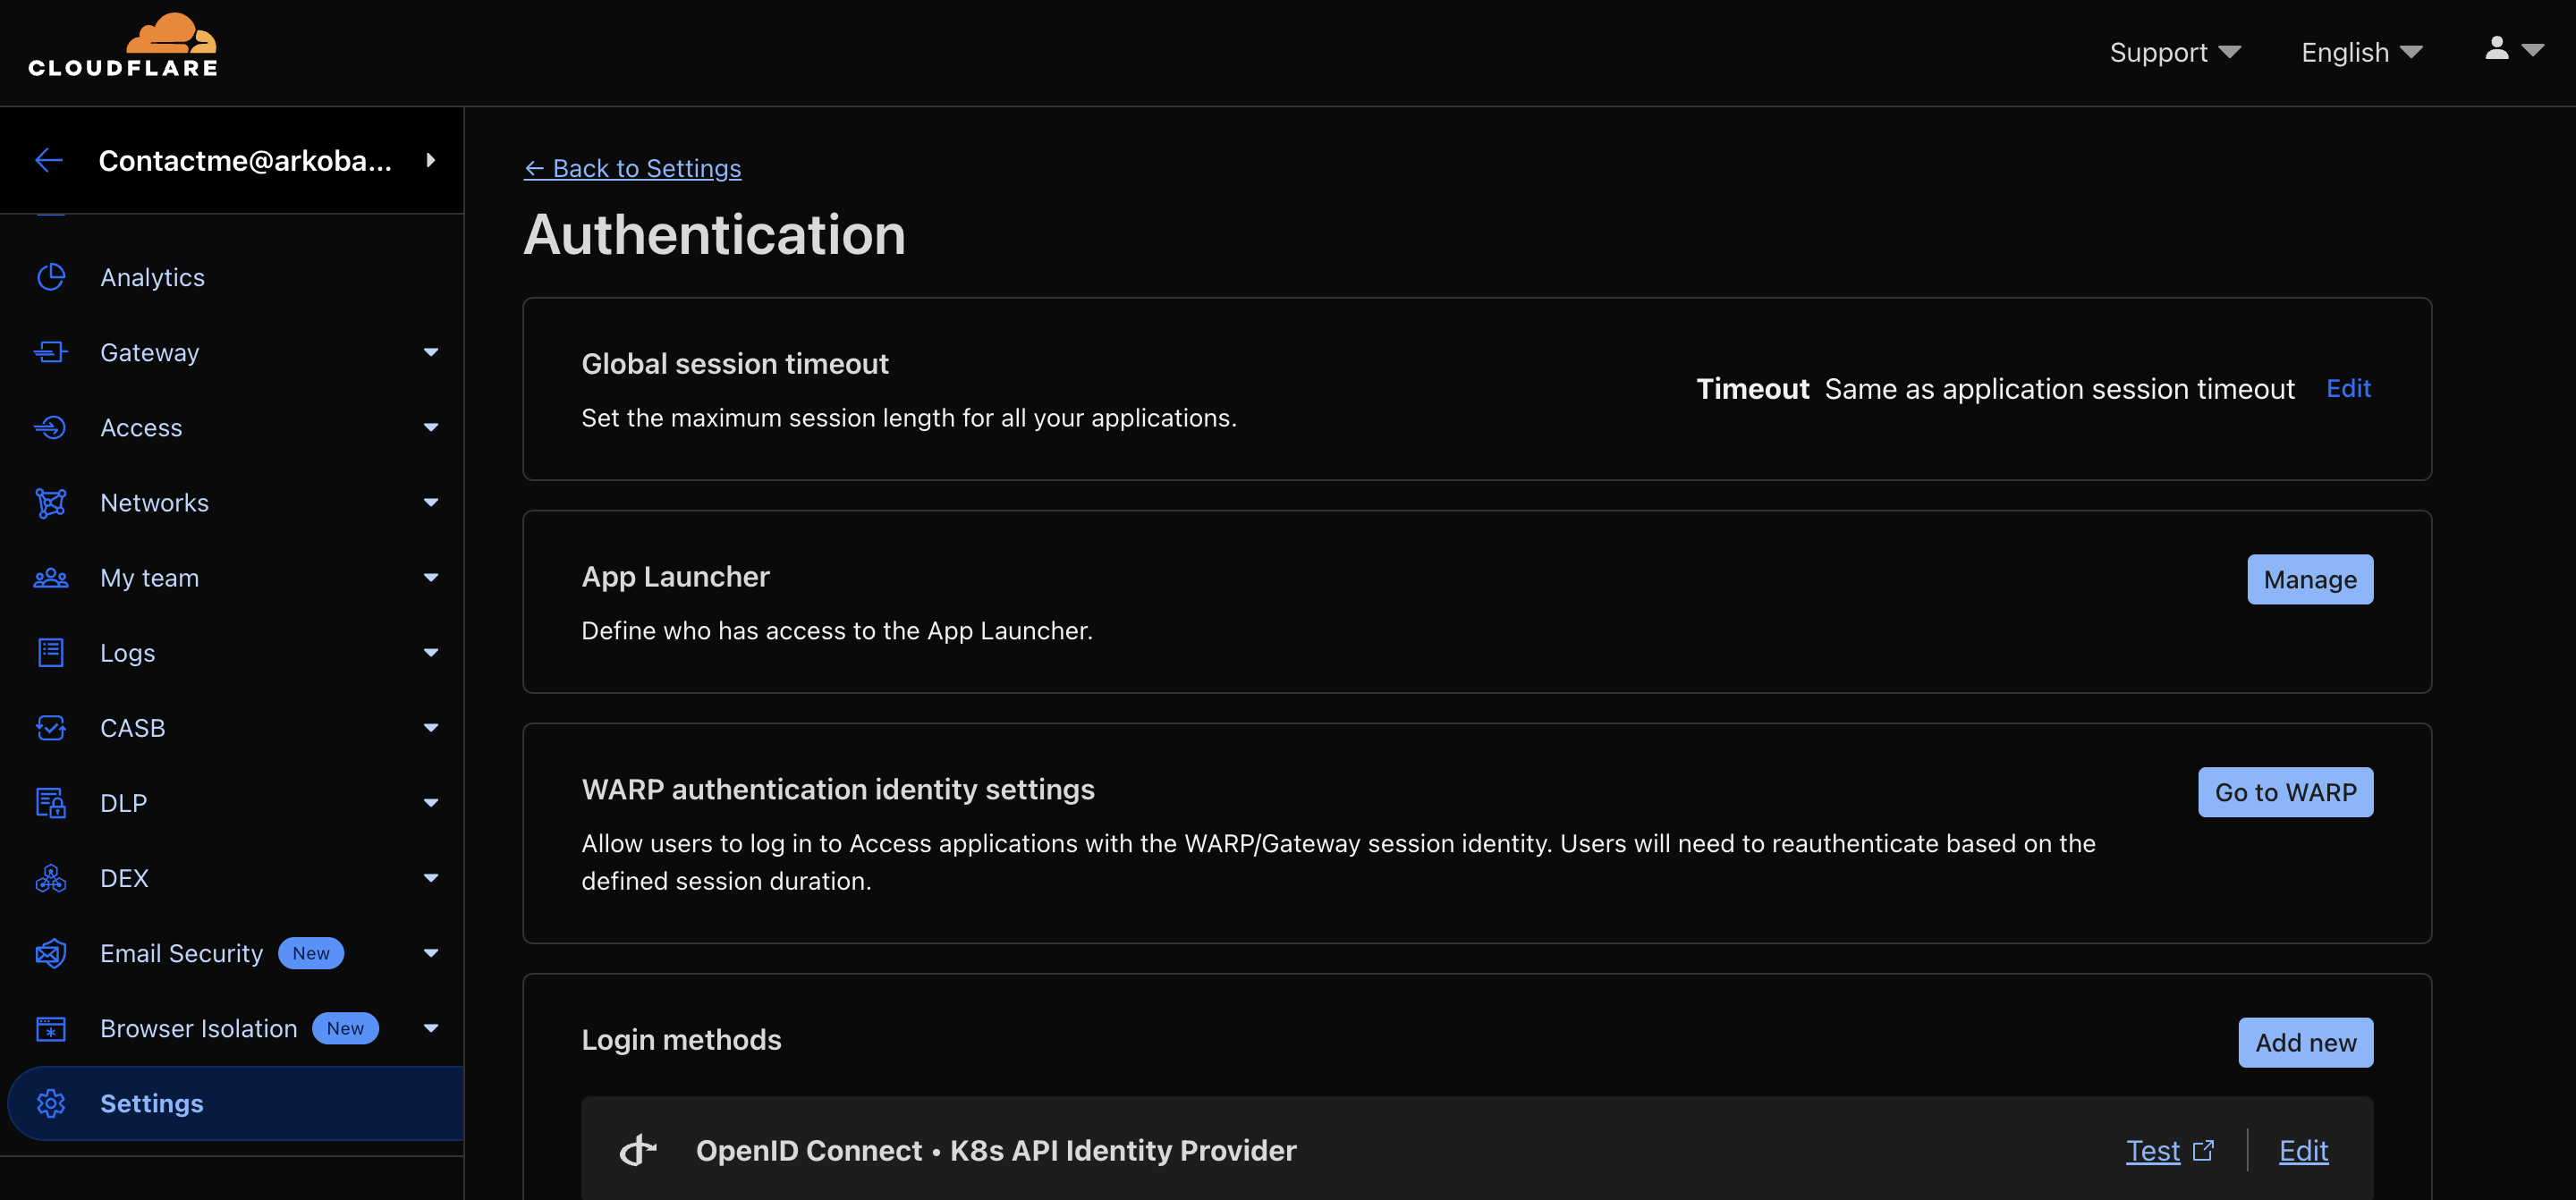
Once you run terraform apply, it will create a Cloudflare Access Identity Provider (IdP) for authenticating users. You can verify the IdP creation in the Cloudflare dashboard under the Zero Trust > Settings > Authentication.
Step 3: Create Cloudflare Access Policies
In this section we will create Cloudflare Access Policies to control access to the Kubernetes API server. These policies will be used to restrict access to the Kubernetes API server based on the Identity Provider (IdP) created in the previous step.
terraform {
  required_providers {
    cloudflare = {
      source  = "cloudflare/cloudflare"
      version = "~> 4"
    }
  }
  required_version = "1.5.7"
}
variable "configuration" {
  description = "Configuration for the Cloudflare Zero Trust Access Policy module."
  type = object({
    account_id = string
    access_policy = object({
      name          = string
      emails        = list(string)
      email_domains = list(string)
    })
    identity_provider_id = string
  })
}
resource "cloudflare_zero_trust_access_policy" "this" {
  account_id       = var.configuration.account_id
  decision         = "allow"
  name             = var.configuration.access_policy.name
  session_duration = "30m"
  include {
    email        = var.configuration.access_policy.emails
    email_domain = var.configuration.access_policy.email_domains
  }
  require {
    login_method = [
      var.configuration.identity_provider_id
    ]
  }
}
output "configuration" {
  value = {
    id = cloudflare_zero_trust_access_policy.this.id
  }
}
With the module in place we can now use it to create Cloudflare Access Policies to control access to the Kubernetes API server.
module "k8s_api_access_policies" {
  source = "../modules/cloudflare/access-policies"
  configuration = {
    account_id = var.cloudflare_default_configurations.account_id
    access_policy = {
      name          = "K8s API Access Policy"
      emails        = ["<your-email-address>"] # This user email should exist on your Keycloak instance or any other IdP you are using.
      email_domains = ["<your-domain>"] # This is the domain you are using for your Kubernetes API server.
    }
    identity_provider_id = module.k8s_api_identity_provider.configuration.id
  }
}
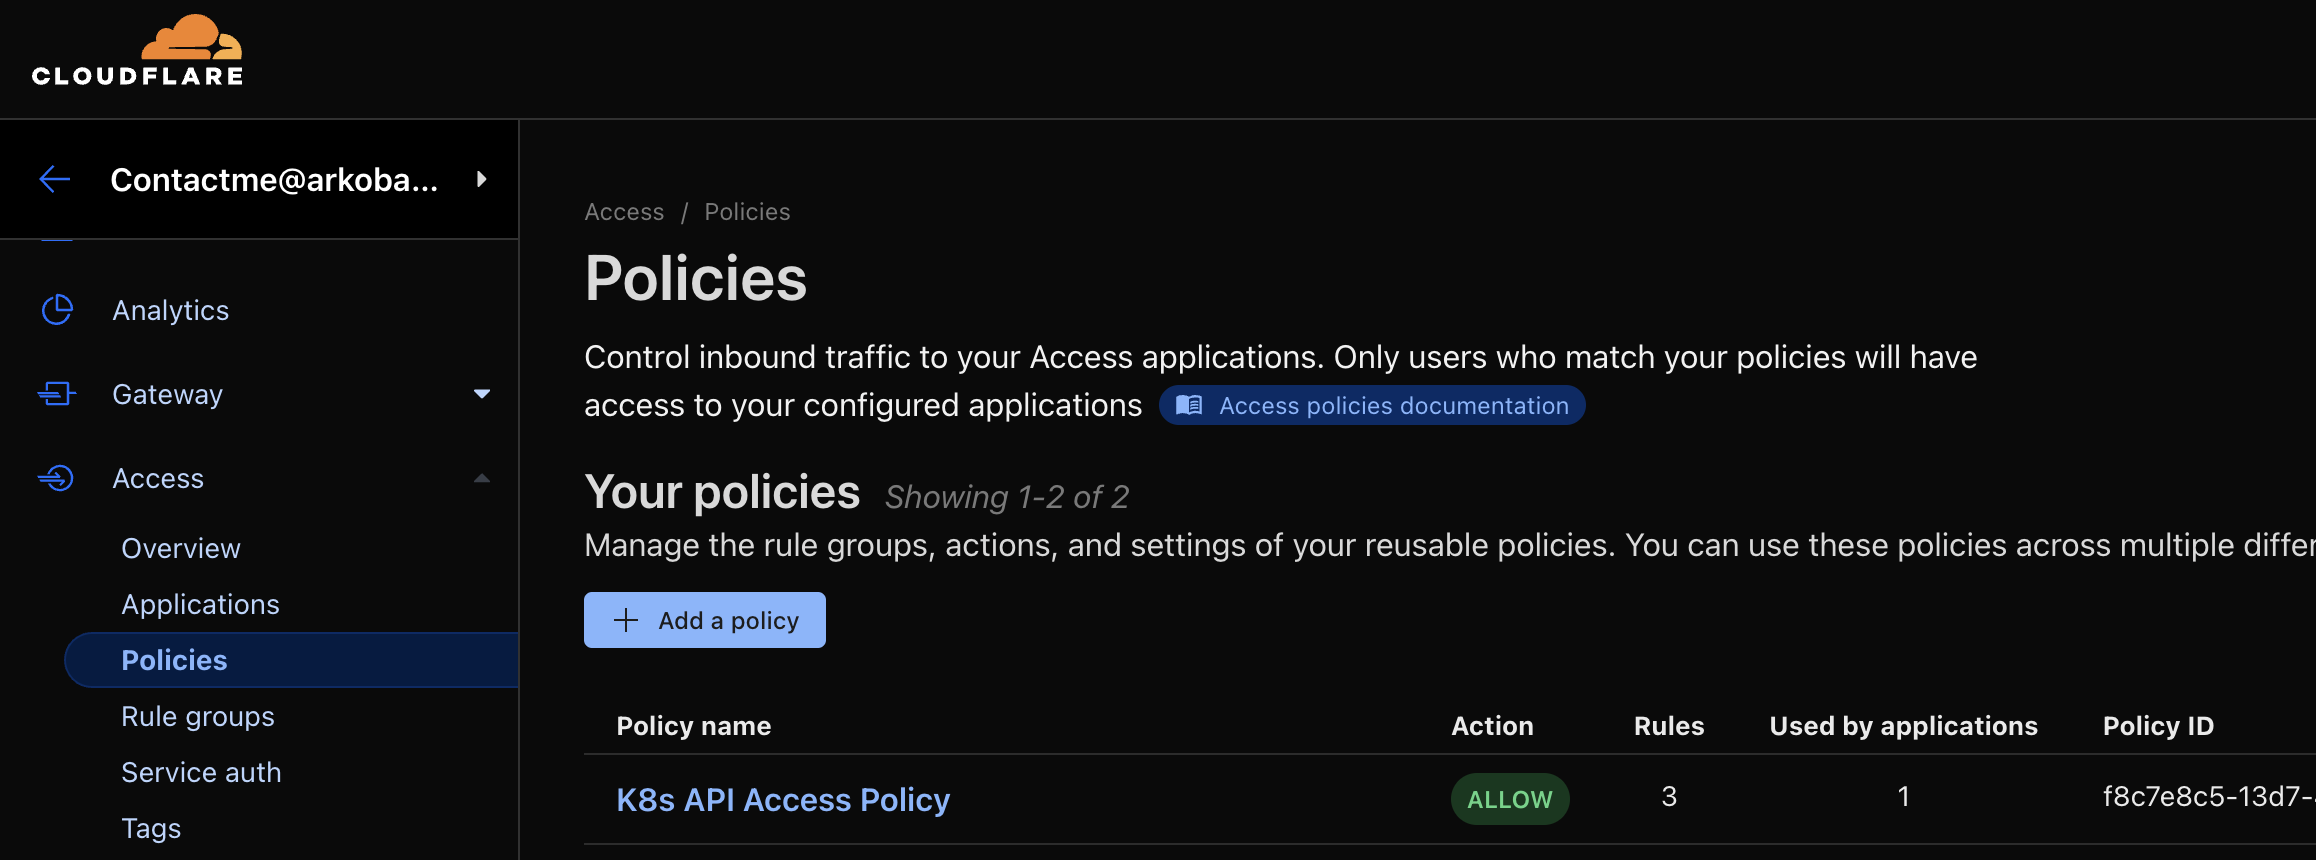
Once you run terraform apply, it will create Cloudflare Access Policies to control access to the Kubernetes API server. You can verify the policies creation in the Cloudflare dashboard under the Zero Trust > Access > Policies section.
Step 4: Create Cloudflare Self Hosted Application for the Kubernetes API
In this section, we will create a Cloudflare Self Hosted Application for the Kubernetes API. This application will be used to securely expose the Kubernetes API server using Cloudflare Tunnels.
For this step we will be creating 3 modules:
- Module for Cloudflare Self Hosted Applications.
- Module for Cloudflare DNS Records.
- Module for Cloudflare Tunnels.
First the module for Cloudflare Self Hosted Applications.
terraform {
  required_providers {
    cloudflare = {
      source  = "cloudflare/cloudflare"
      version = "~> 4"
    }
  }
  required_version = "1.5.7"
}
variable "configuration" {
  description = "Configuration for the Cloudflare Self-Hosted Apps module."
  type = object({
    zone_id           = string
    name              = string
    session_duration  = optional(string, "30m")
    access_policy_ids = list(string)
    domain            = string
    destinations = optional(list(object({
      uri = string
    })), [])
  })
}
resource "cloudflare_zero_trust_access_application" "this" {
  zone_id          = var.configuration.zone_id
  name             = var.configuration.name
  domain           = var.configuration.domain
  type             = "self_hosted"
  session_duration = var.configuration.session_duration
  policies         = var.configuration.access_policy_ids
  dynamic "destinations" {
    for_each = var.configuration.destinations
    content {
      uri = destinations.value.uri
    }
  }
}
output "configuration" {
  value = {
    zone_id = cloudflare_zero_trust_access_application.this.zone_id
    domain  = cloudflare_zero_trust_access_application.this.domain
    name    = cloudflare_zero_trust_access_application.this.name
  }
}

output "aud" {
  sensitive = true
  value     = cloudflare_zero_trust_access_application.this.aud
}
Next up is the Module for Cloudflare DNS Records.
terraform {
  required_providers {
    cloudflare = {
      source  = "cloudflare/cloudflare"
      version = "~> 4"
    }
  }
  required_version = "1.5.7"
}
variable "cloudflare_configuration" {
  type = object({
    zone_id = string
  })
  description = "values for the cloudflare zone configurations"
  sensitive   = true
}

variable "record" {
  type = object({
    name    = string
    type    = optional(string, "CNAME")
    content = string
    ttl     = optional(number, 1)
    proxied = optional(bool, true)
  })
  description = "values for the cloudflare record configurations"
}
resource "cloudflare_record" "this" {
  zone_id = var.cloudflare_configuration.zone_id
  name    = var.record.name
  content = var.record.content
  type    = var.record.type
  proxied = var.record.proxied
}
output "hostname" {
  value = cloudflare_record.this.hostname
}
Next up, is the module for Cloudflare Tunnels. This module will be used to create a Cloudflare Tunnel on a Kubernetes Cluster.
terraform {
  required_providers {
    cloudflare = {
      source  = "cloudflare/cloudflare"
      version = "~> 4"
    }
    random = {
      source = "hashicorp/random"
    }
    kubernetes = {
      source  = "hashicorp/kubernetes"
      version = "2.35.1"
    }
  }
  required_version = "1.5.7"
}
variable "cloudflare_configuration" {
  type = object({
    account_id = string
  })
  description = "values for the default cloudflare configurations"
  sensitive   = true
}

variable "tunnel_configuration" {
  type = object({
    name             = string
    deploy_namespace = string
  })
  description = "values for the default cloudflare tunnel configurations"
}

variable "ingress_rules" {
  description = "List of ingress rules for the Cloudflare Tunnel"
  type = list(object({
    hostname = string
    service  = string
    origin_request = optional(object({
      no_tls_verify = optional(bool, false)
      proxy_type    = optional(string, null)
      access = optional(object({
        team_name = string
        aud       = list(string)
        required  = optional(bool, true)
      }), null)
    }), null)
  }))
}
data "kubernetes_namespace" "deploy_to" {
  metadata {
    name = var.tunnel_configuration.deploy_namespace
  }
}
resource "random_password" "this" {
  length = 64
}

resource "cloudflare_zero_trust_tunnel_cloudflared" "this" {
  account_id = var.cloudflare_configuration.account_id
  name       = "Terraform managed cloudfare tunnel for ${var.tunnel_configuration.name}"
  secret     = base64sha256(random_password.this.result)
}

resource "cloudflare_zero_trust_tunnel_cloudflared_config" "this" {
  tunnel_id  = cloudflare_zero_trust_tunnel_cloudflared.this.id
  account_id = var.cloudflare_configuration.account_id
  config {
    dynamic "ingress_rule" {
      for_each = var.ingress_rules
      content {
        hostname = ingress_rule.value.hostname
        service  = ingress_rule.value.service

        dynamic "origin_request" {
          for_each = ingress_rule.value.origin_request != null ? [ingress_rule.value] : []
          content {
            no_tls_verify = ingress_rule.value.origin_request.no_tls_verify

            proxy_type = ingress_rule.value.origin_request.proxy_type != null ? ingress_rule.value.origin_request.proxy_type : null

            dynamic "access" {
              for_each = ingress_rule.value.origin_request.access != null ? [ingress_rule.value.origin_request.access] : []
              content {
                team_name = ingress_rule.value.origin_request.access.team_name
                aud_tag   = ingress_rule.value.origin_request.access.aud
                required  = ingress_rule.value.origin_request.access.required
              }
            }
          }
        }
      }
    }
    ingress_rule {
      service = "http_status:404"
    }
  }
}
resource "kubernetes_deployment_v1" "this" {
  depends_on = [
    cloudflare_zero_trust_tunnel_cloudflared_config.this
  ]
  metadata {
    name      = "cft-${var.tunnel_configuration.name}"
    namespace = data.kubernetes_namespace.deploy_to.metadata[0].name
  }
  spec {
    replicas = 2
    selector {
      match_labels = {
        app = "cft-${var.tunnel_configuration.name}"
      }
    }
    template {
      metadata {
        labels = {
          app = "cft-${var.tunnel_configuration.name}"
        }
      }
      spec {
        security_context {
          run_as_user     = 1000
          run_as_group    = 3000
          fs_group        = 2000
          run_as_non_root = true
        }
        container {
          name  = "cloudflared"
          image = "cloudflare/cloudflared:latest"
          command = [
            "cloudflared",
            "tunnel",
            "--metrics",
            "0.0.0.0:2880",
            "--no-autoupdate"
          ]
          args = [
            "run",
            "--token",
            "${cloudflare_zero_trust_tunnel_cloudflared.this.tunnel_token}",
          ]
          security_context {
            allow_privilege_escalation = false
            seccomp_profile {
              type = "RuntimeDefault"
            }
            run_as_non_root = true
            capabilities {
              drop = ["ALL"]
              add  = ["NET_BIND_SERVICE"]
            }
          }
          liveness_probe {
            http_get {
              path = "/ready"
              port = 2880
            }
            initial_delay_seconds = 10
            period_seconds        = 10
            failure_threshold     = 1
          }
        }
      }
    }
  }
}
With the above modules in place we can now use it to create a Cloudflare Self Hosted Application for securely exposing our Kubernetes API.
module "k8s_api_cloudflare_record" {
  source = "../modules/cloudflare/records"
  cloudflare_configuration = {
    zone_id = var.cloudflare_default_configurations_personal.zone_id
  }
  record = {
    name    = "home-cluster" # This is the subdomain you want to use for your Kubernetes API server. And should match what you used on the certificate generation step.
    content = module.k8s_api_cloudflare_tunnel.configuration.cname
  }
}

module "k8s_api_cloudflare_tunnel" {
  source = "../modules/cloudflare/tunnel-configuration"
  cloudflare_configuration = {
    account_id = var.cloudflare_default_configurations_personal.account_id
  }
  tunnel_configuration = {
    name             = "home-cluster-k8s-api"
    deploy_namespace = "default"
  }
  ingress_rules = [
    {
      hostname = module.k8s_api_cloudflare_record.hostname
      service  = "tcp://kubernetes:443"
      origin_request = {
        access = {
          # This the Cloudflare Access Team Name. You can find it in the Cloudflare dashboard under Zero Trust > Settings > Custom Pages.
          team_name = <your-cloudflare-team-name>
          aud = [
            module.cloudflare_self_hosted_k8s_api.aud
          ]
          required = true
        }
        proxy_type = "socks"
      }
    }
  ]
}

module "cloudflare_self_hosted_k8s_api" {
  source = "../modules/cloudflare/self-hosted-apps"
  configuration = {
    zone_id = var.cloudflare_default_configurations_personal.zone_id
    name    = "Self-Hosted home cluster Kubernetes API"
    domain  = module.k8s_api_cloudflare_record.hostname
    access_policy_ids = [
      module.k8s_api_access_policies.configuration.id
    ]
  }
}
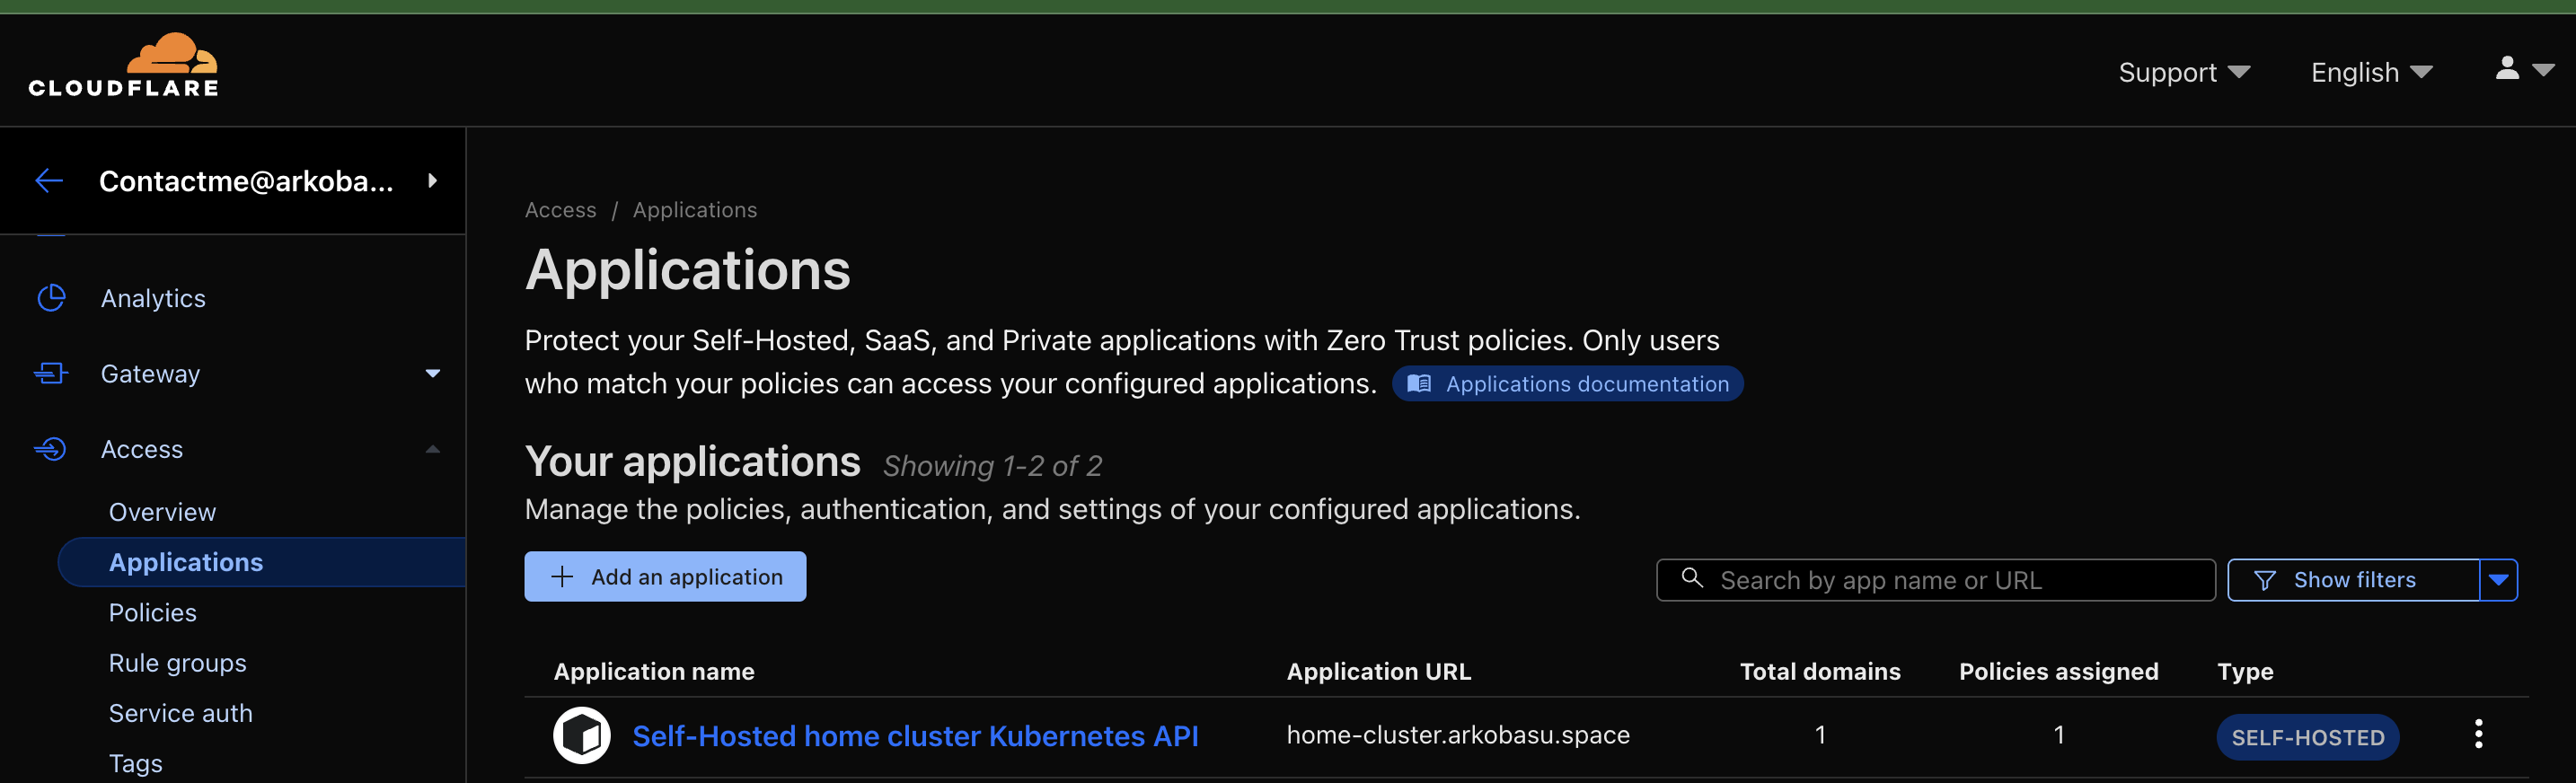
Once you run terraform apply, it will create a Cloudflare Self Hosted Application for the Kubernetes API server, and securely expose it using Cloudflare Tunnels. You can verify the application creation in the Cloudflare dashboard under the Zero Trust > Access > Applications section.

And voila! You now have a secure Cloudflare Access setup for your Kubernetes API server. You can access the Kubernetes API server using the domain you configured in the previous steps, and it will be protected by Cloudflare Access policies. Let's see how.
Validation
- You will need the
kubeconfigafter the certs were generated in Step 1. - Update the server URL in the
kubeconfigfile to point to the domain you configured in Step 4. For example, if you configured the domain ashome-cluster.<cf_domain>, update the server URL tohttps://home-cluster.<cf_domain>. - Ensure you have the
cloudflaredbinary installed on your local machine. You can download it from the Cloudflare documentation. - Run the following command to create a connection from your device to Cloudflare:
cloudflared access tcp --hostname home-cluster.<yourdomain> --url 127.0.0.1:1234 - On a separate terminal run the following command:
alias kubeone="env HTTPS_PROXY=socks5://127.0.0.1:1234 kubectl --kubeconfig <path-to-your-updated-kubeconfig-file>" - Now you can run the following command to test the connection:
kubeone get pod -A
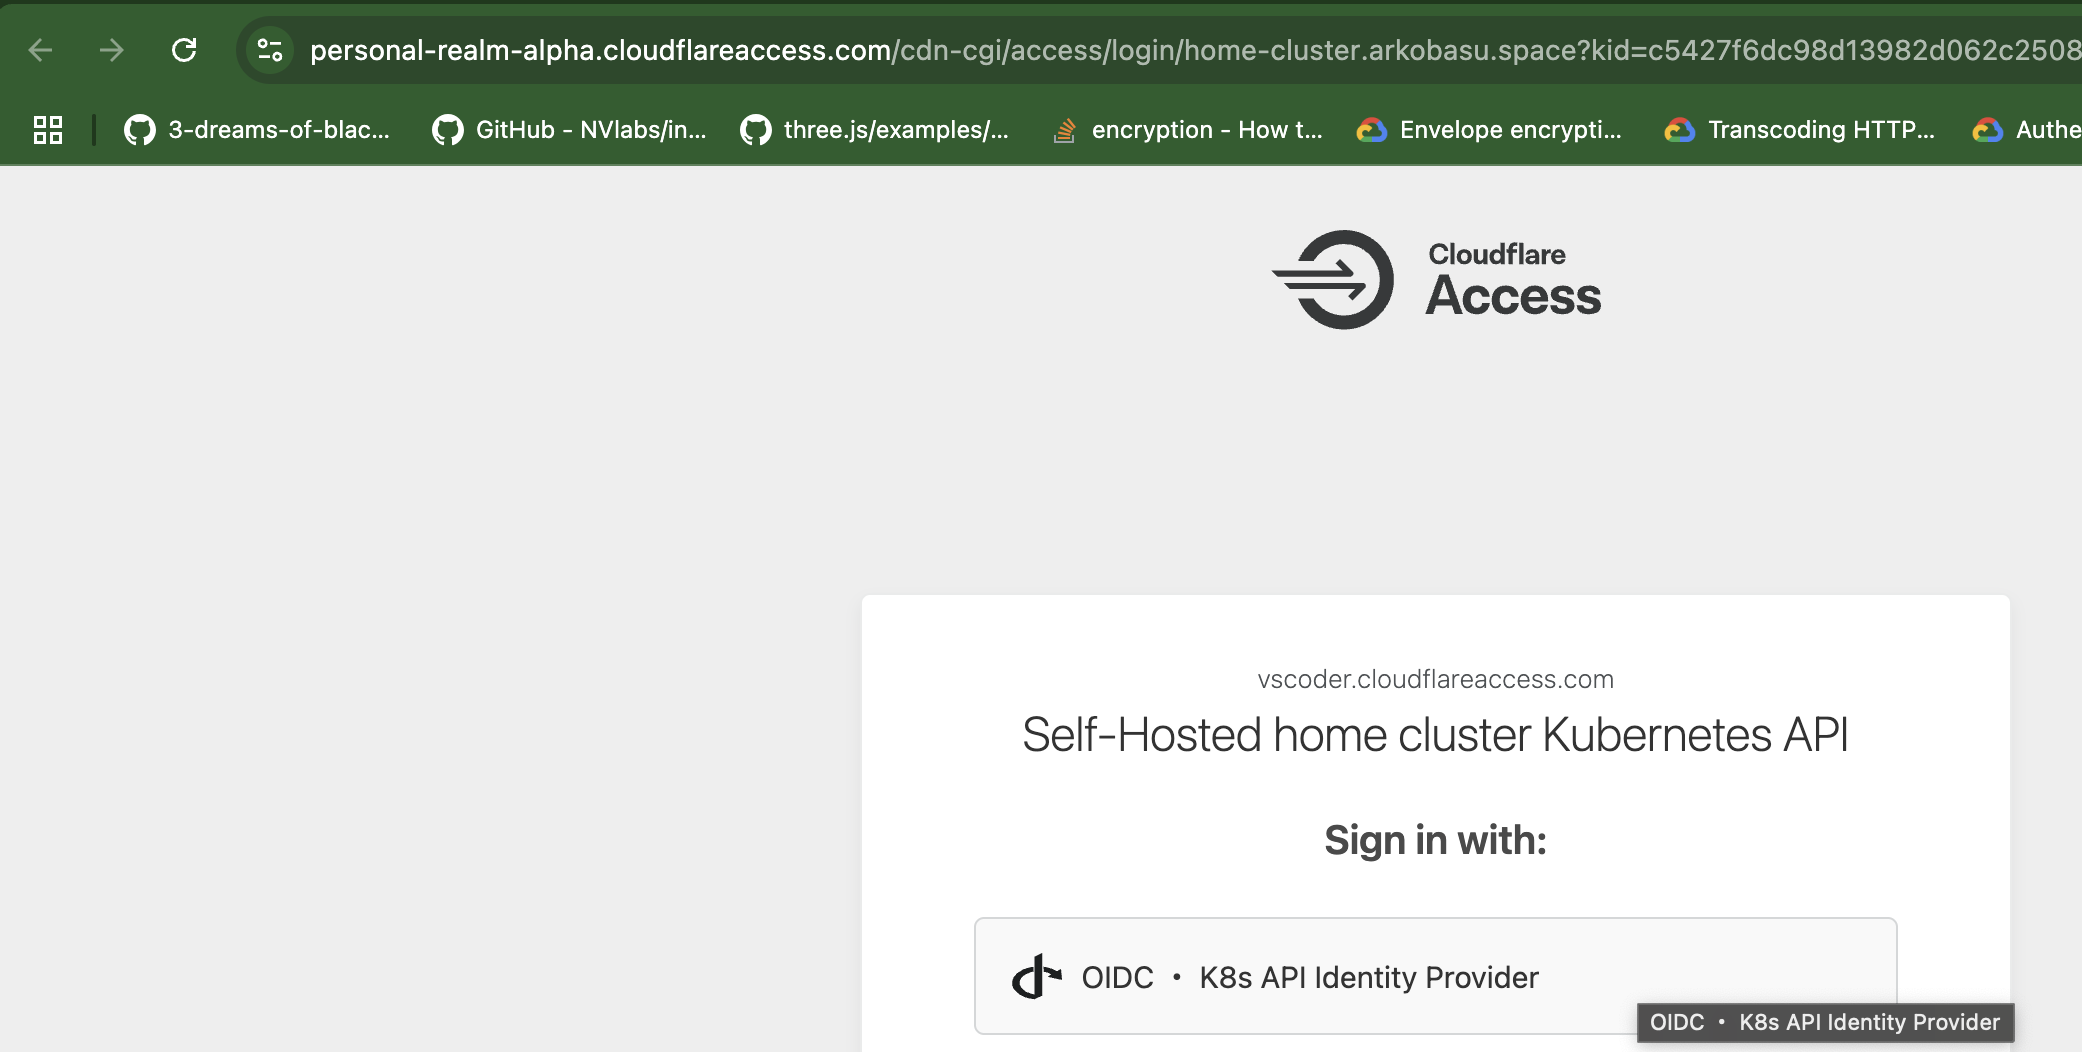
When you run the last command kubeone get pod -A, it will prompt you to authenticate using the Cloudflare Access Identity Provider (IdP) you configured in Step 2. Once authenticated, you will be able to access the Kubernetes API server securely.

Conclusion
With this setup, you have successfully secured your Kubernetes API server using Cloudflare Access. This approach provides a secure, identity-based authentication mechanism without exposing your cluster to the public internet or requiring a VPN, Ingress Controllers, Load Balancers or any direct attack vector on your network.
We have not used OIDC Client as RBAC control into our Cluster. May be a future blog if there is enough interest.