Own Your Authentication: Self-Hosting an OIDC Client Using Keycloak
Published on: Wednesday, February 26, 2025
Introduction
In today's cloud-native world, securing access to applications is crucial, and OpenID Connect (OIDC) provides a robust solution for authentication. By self-hosting an OIDC client with Keycloak, you gain full control over identity management without relying on third-party services. In this guide, I'll walk through setting up a self-hosted OIDC client using Keycloak, automated with Terraform, to ensure a scalable, secure, and easily maintainable deployment. Whether you're securing internal tools or external applications, this approach empowers you to manage authentication on your terms.
Prerequisites
In order to follow this blog you will need:
- A working Keycloak instance for this. You can chose to use
- Phase Two for a managed Keycloak deployment for quickly getting started, or
- Refer to my blog on using Terraform to quickly deploy a Keycloak instance on any commodity hardware and expose it to public internet using Cloudflare Tunnels.
- A Cloudflare account with Fully-setup DNS.
- Terraform installed locally on your machine. Feel free to use tfenv to quickly get started.
If you are following my blog for setting up your own Keycloak instance, then you can simply skip the prerequisite section and dive straight in.
Overview
In this blog we are going to use Terraform to interact with a Keycloak Instance to:
- Create a client on Keycloak master realm as a Service Account to securely interact and manage our keycloak instance.
- Create a Keycloak Realm.
- Create a Realm specific user (for yourself) and then use protocol mappers to assign default realm roles. This will allow us to login to the realm on the web console and validate access and also reset passwords if you need to.
- Create custom Keycloak Roles that we can use in various other applications. I will only cover creating these roles. How we use them - will be covered in separate blogs that will follow.
- Assign the Keycloak realm user all the custom roles. This should provide a template on how different roles can be setup for a user.
- An OIDC client on the realm,
- And finally an Open ID client scope that we can then consume post authentication from clients that will use this OIDC Client for securing access.
Let's get started! 🚀
Step 1: Create a Open ID Client for managing Keycloak Instance
We are going to use the official Keycloak Terraform provider. It can be configured to use both client credentials or password grant types. The client credentials is the recommended way for doing this since it was designed for machine to machine authentication. Please refer to the Terraform provider documentation for more information.
- Create a Terraform Client
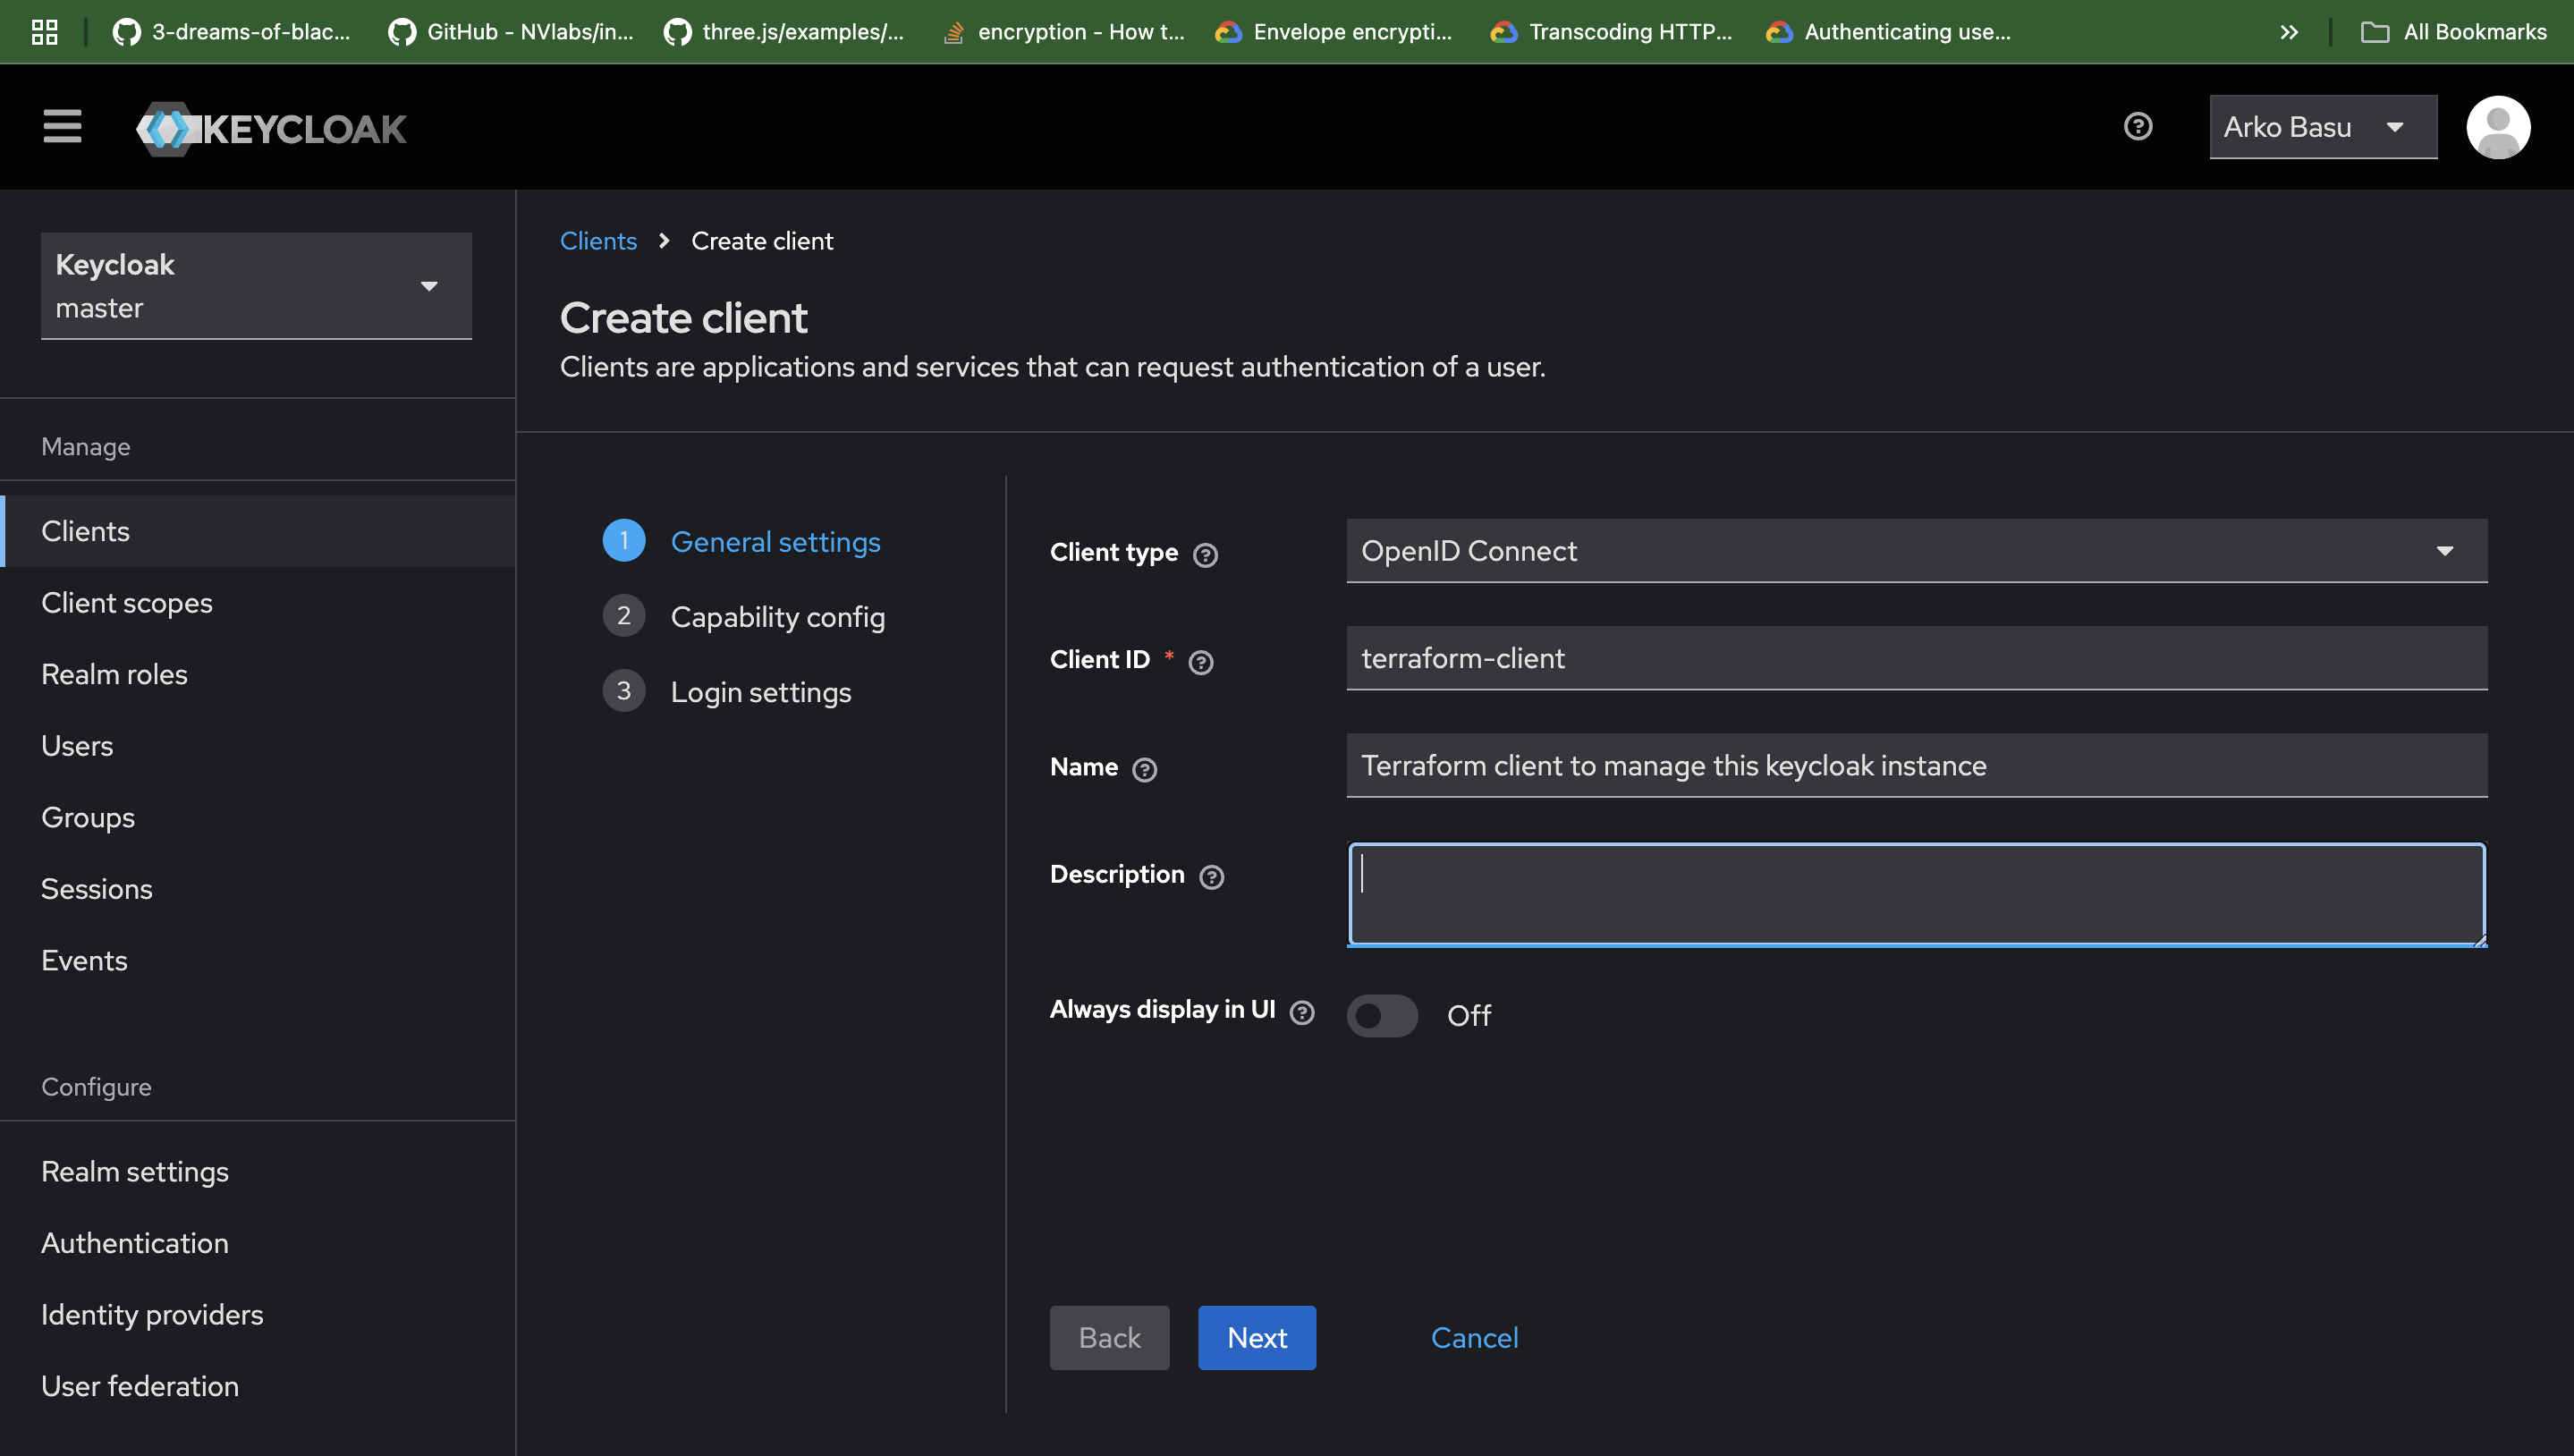
- Configure it to set Access type Confidential, disable Standard Flow and Direct Access Grant, and enable Service Accounts
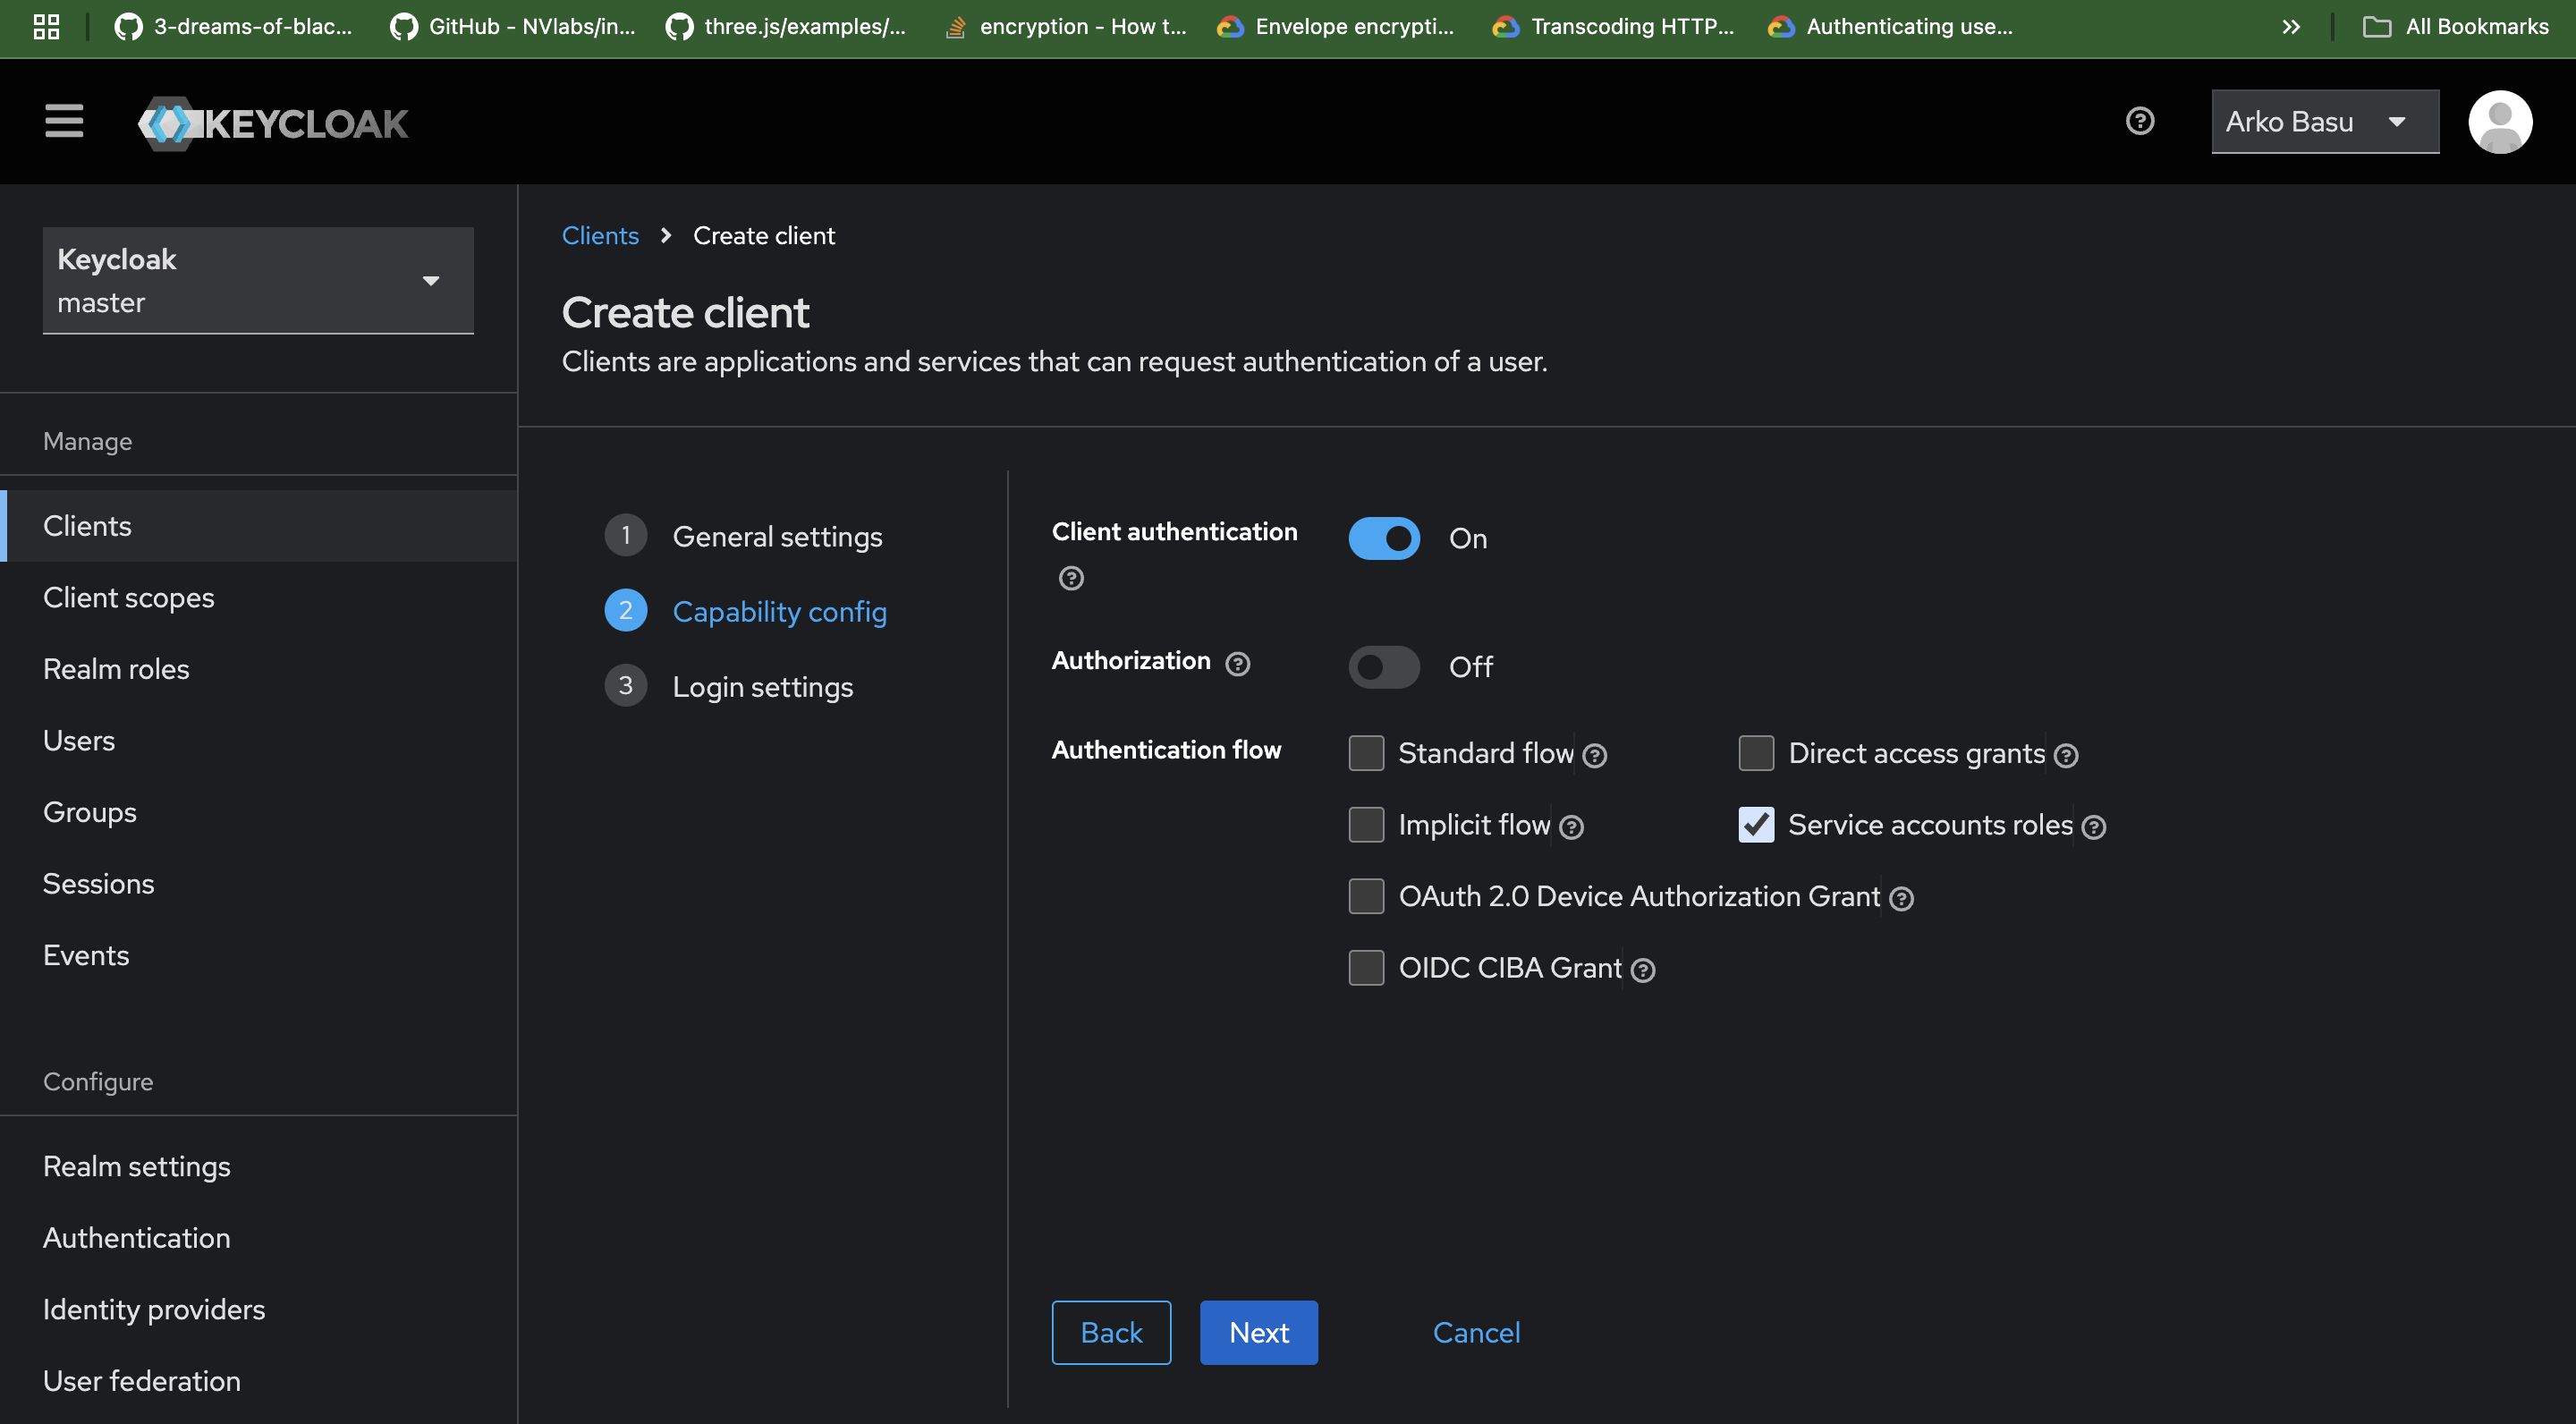
- Provide admin roles for the client.

The above configuration allows for the full Keycloak instance management through terraform. You can refer to the provider documentation in case you want to setup the terraform client to manage only realms and with lower permissions. But to follow the steps outlined in this blog - this is the recommended configuration.
Step 2 - 7: Terraform Keycloak resources
With the above client sorted out, in this section we are going to create the necessary terraform scripts to create all the resources necessary for securing access to applications that support OIDC clients.
- Let's create a folder first and setup some basics
# Create a directory to hold our terraform scripts mkdir ./keycloak-oidc-client # Navigate inside cd keycloak-oidc-client # Create necessary files touch variables.tf # For defining variables we are going to use touch variables.auto.tfvars # For populating variable values but not putting in version control touch provider.tf # This will hold our provider configuration touch realm.tf # This will hold our new realm. Since shouldn't be using master realm for anything other that administration touch user.tf # This will hold our user configuration, custom roles and role mappings touch client.tf # This will hold our OIDC client configuration and scopes - Setup some variables first. ~/keycloak-oidc-client/variables.tf
variable "keycloak_terraform_client_secret" { description = "The client secret for the terraform client in keycloak" sensitive = true } variable "realm_name" { description = "The name of the personal realm in Keycloak" type = string } variable "realm_display_name" { description = "The display name of the personal realm in Keycloak" type = string } variable "smtp_host" { description = "The host for the SMTP server in the personal realm in Keycloak" type = string } variable "smtp_port" { description = "The port for the SMTP server in the personal realm in Keycloak" type = number } variable "smtp_from_email" { description = "The email address to send emails from in the personal realm in Keycloak" type = string } variable "smtp_from_name" { description = "The name to send emails from in the personal realm in Keycloak" type = string } variable "smtp_password" { description = "The password for the SMTP server in the personal realm in Keycloak" sensitive = true } variable "temp_user_password" { description = "The temporary password for the user in the personal realm in Keycloak" sensitive = true } variable "oidc_client_id" { description = "The client ID for the personal realm in Keycloak" type = string } variable "oidc_client_name" { description = "The client name for the personal realm in Keycloak" type = string } variable "oidc_client_valid_redirect_urls" { description = "The valid redirect URLs for the personal realm in Keycloak" type = list(string) } variable "oidc_client_access_type" { description = "The access type for the personal realm in Keycloak" type = string } variable "oidc_client_default_scopes" { description = "The default scopes for the personal realm in Keycloak" type = list(string) } - Let's provide some values for these variables.~/keycloak-oidc-client/variables.auto.tfvars
realm_name         = "personal-realm"
realm_display_name = "My Personal Realm"
# We should configure SMTP so that we can use functionality like verification and resetting password
smtp_host          = "<your-smtp-host>"
smtp_port          = 465
smtp_from_email    = "<email>"
smtp_from_name     = "My Name"
oidc_client_id     = "my-personal-access"
oidc_client_name   = "My Personal Access Client"
oidc_client_valid_redirect_urls = [
    # Cloudflare Access allows securing your self-hosted apps with various Identity Providers.
    "https://<cloudflare-team>.cloudflareaccess.com/cdn-cgi/access/callback",
    # You can add more valid redirect URLs that you wish to use this client with
    # For example if you are setting up Personal Assistant following my other blog include the desired URL
    "https://personal-ai.<your-domain>.com/*"
]
oidc_client_access_type = "CONFIDENTIAL"
oidc_client_default_scopes = [
    "profile",
    "email",
    "web-origins",
    "roles"
]
# This is the secret for the Service Account enabled client we created in the previous step. Refer to image below
keycloak_terraform_client_secret = "<Terraform Client secret>"
# Do not use real passwords. Most SMTP based providers have the ability to create application specific passwords
smtp_password                    = "<your-application-password>"
temp_user_password               = "<temppassword>"
Grab the client secret from here: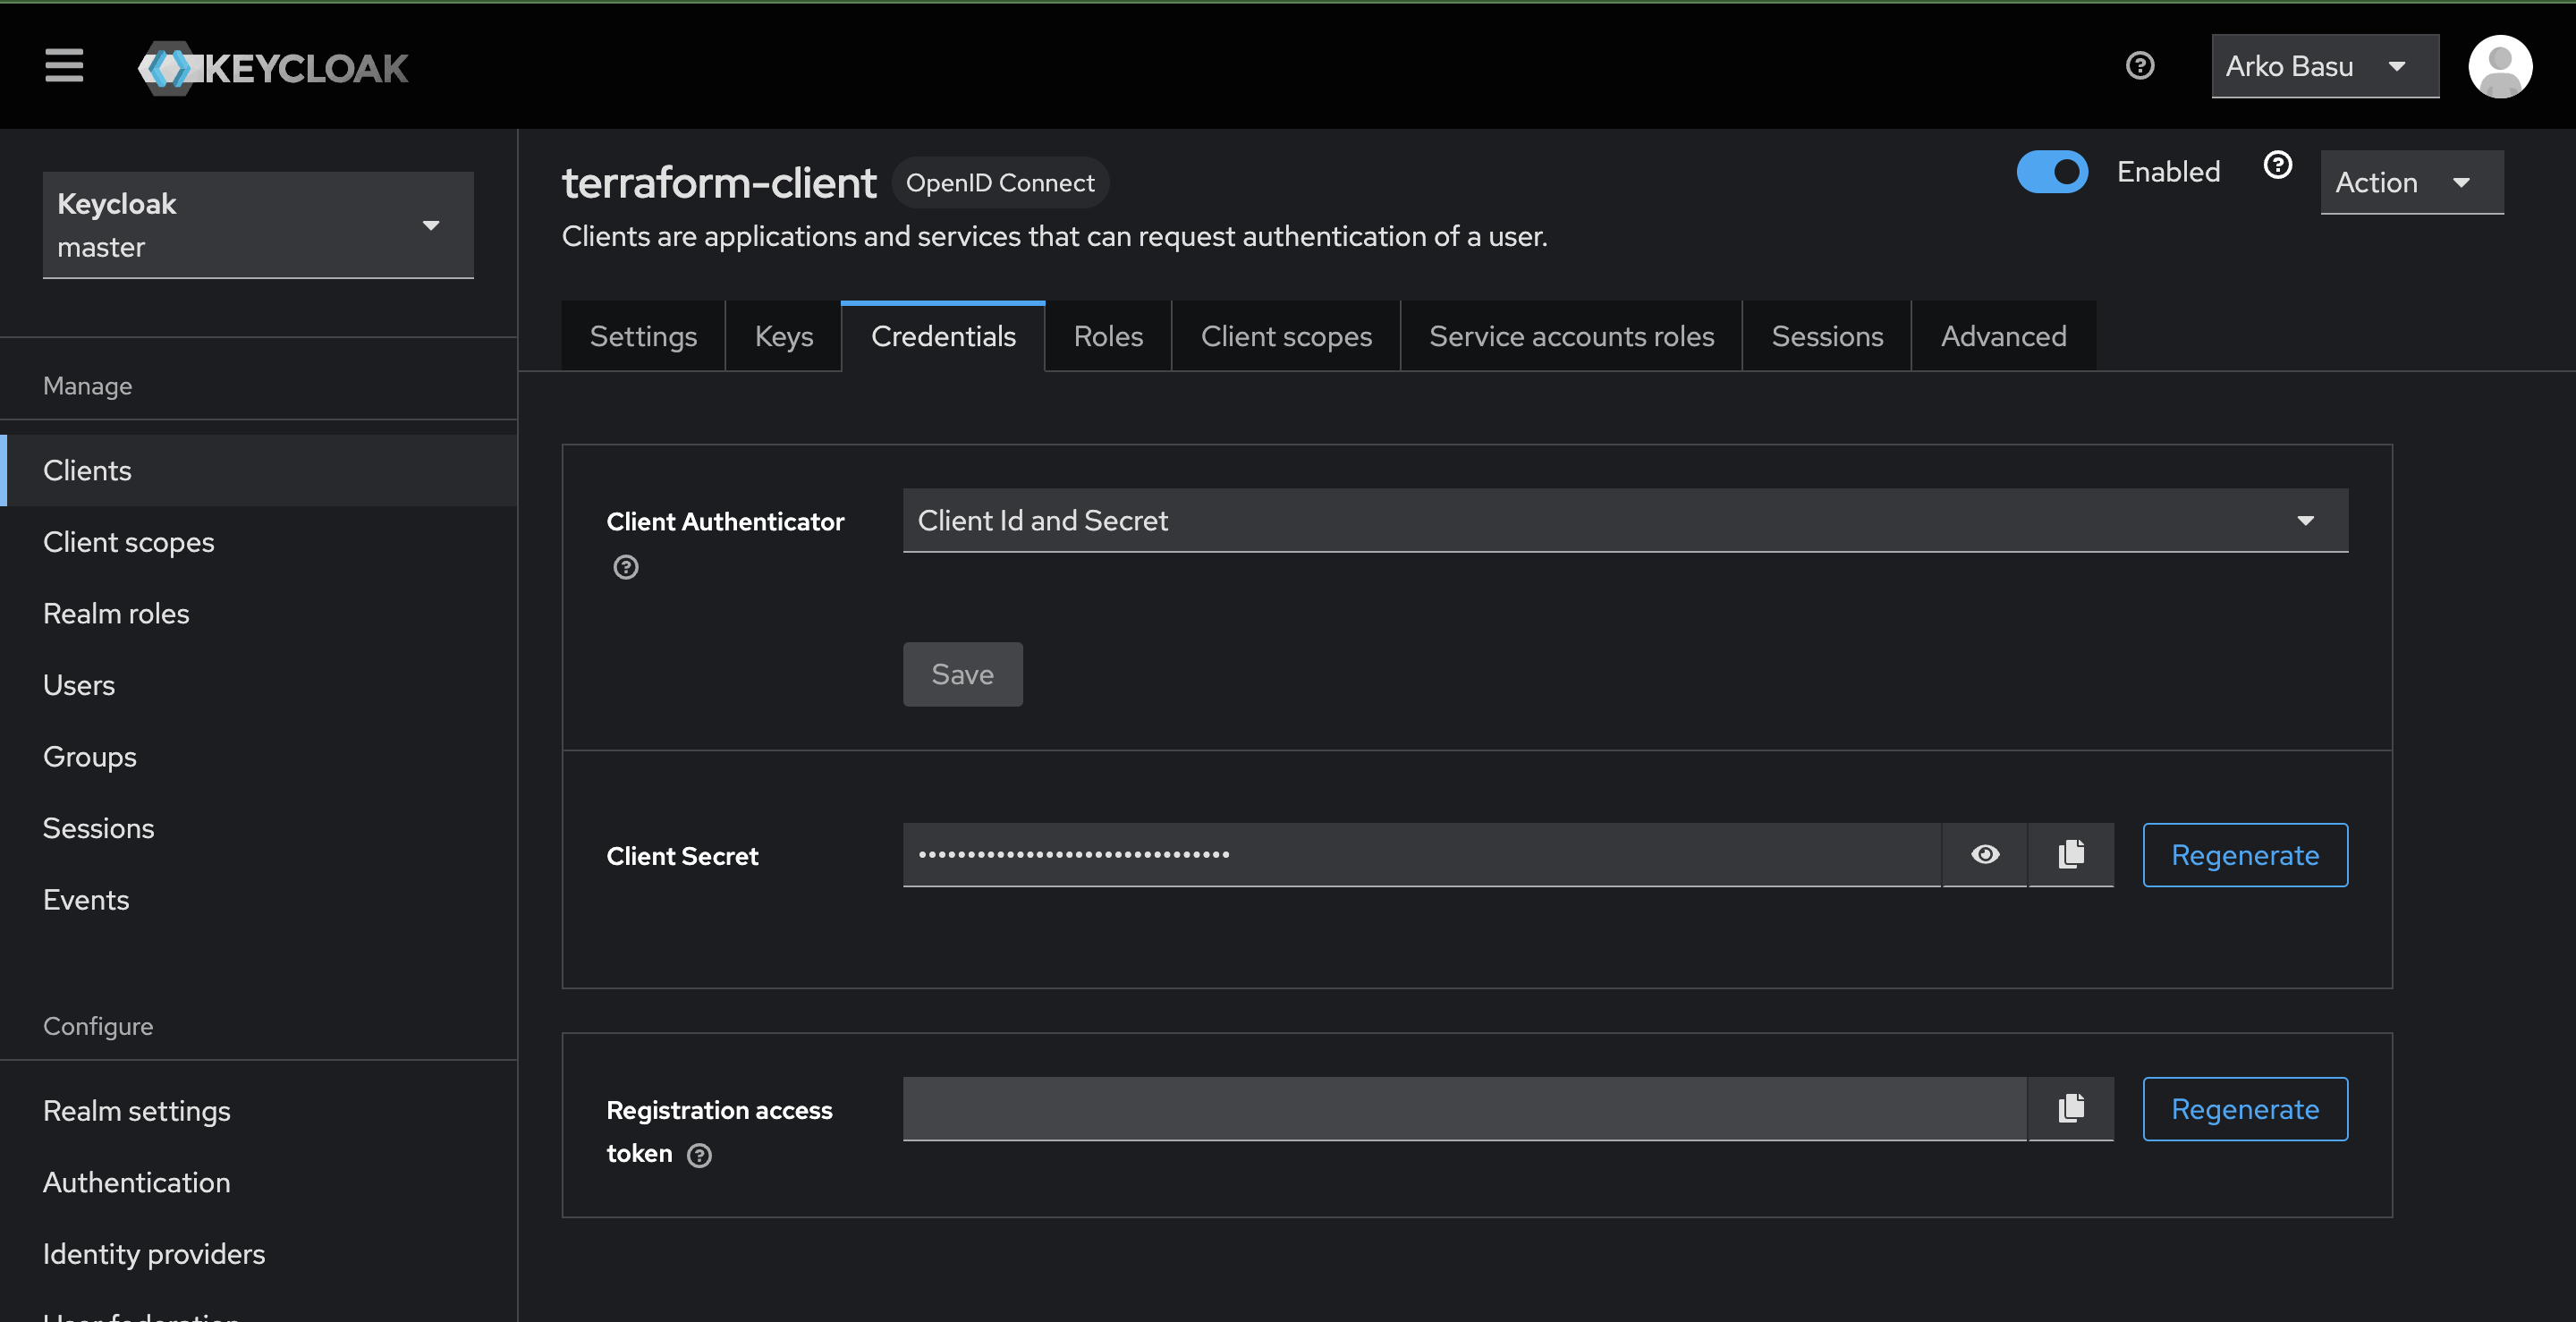
- On to configuring our provider. ~/keycloak-oidc-client/provider.tf
terraform { required_providers { keycloak = { source = "keycloak/keycloak" version = "5.0.0" } random = { source = "hashicorp/random" } } } provider "keycloak" { # ID of the Keycloak client we created in Step - 1. client_id = "terraform-client" client_secret = var.keycloak_terraform_client_secret # This is your publicly available Keycloak instance endpoint. # If you followed the instructions from my blog to create the instance - use the base URL. # Alternatively you can also use a private IP if you are already within the network boundary url = "https://<your-keycloak-instance-endpoint-or-IP>" } - Creating a realm.~/keycloak-oidc-client/realm.tf
resource "keycloak_realm" "default" { realm = var.realm_name display_name = var.realm_display_name password_policy = "upperCase(1) and length(8) and forceExpiredPasswordChange(365) and notUsername" default_signature_algorithm = "RS256" reset_password_allowed = true smtp_server { host = var.smtp_host port = var.smtp_port from = var.smtp_from_email from_display_name = var.smtp_from_name reply_to = var.smtp_from_email reply_to_display_name = var.smtp_from_name ssl = true auth { username = var.smtp_from_email password = var.smtp_password } } } - Create user and custom roles and assign it to the user. ~/keycloak-oidc-client/user.tf
# this resource creates the user resource "keycloak_user" "me" { realm_id = keycloak_realm.default.id # Use your desired username username = "<your-desired-username>" enabled = true # Use any email you'd like for the user. This will be used for verification purposes and resetting passwords email = "<your-email@domain>" first_name = "<your-first-name>" last_name = "<your-last-name>" # If set to false, your first login would require a verification step email_verified = true # Setting temporary password initial_password { value = var.temp_user_password temporary = true } } resource "keycloak_openid_user_client_role_protocol_mapper" "user_client_role_mapper" { realm_id = keycloak_realm.default.id client_id = keycloak_openid_client.personal.id name = "client-role-mapper" claim_name = "groups" multivalued = true add_to_id_token = true add_to_access_token = true add_to_userinfo = true } # Custom role 1 resource "keycloak_role" "kubernetes_admin" { realm_id = keycloak_realm.default.id client_id = keycloak_openid_client.personal.id name = "kubernetes-admin" description = "Manage Kubernetes cluster" } # Custom role 2 resource "keycloak_role" "vault_admin" { realm_id = keycloak_realm.default.id client_id = keycloak_openid_client.personal.id name = "vault-admin" description = "Manage Vault" } # Default realm roles data "keycloak_role" "default_realm_roles" { realm_id = keycloak_realm.default.id name = "default-roles-${keycloak_realm.default.id}" } resource "keycloak_user_roles" "my_roles" { realm_id = keycloak_realm.default.id user_id = keycloak_user.me.id role_ids = [ keycloak_role.kubernetes_admin.id, keycloak_role.vault_admin.id, # The default roles allows you to login using web console data.keycloak_role.default_realm_roles.id ] } - Create OIDC client and it's scopes~/keycloak-oidc-client/client.tf
resource "random_password" "openid_client_secret" { length = 32 special = false } resource "keycloak_openid_client" "personal" { realm_id = keycloak_realm.default.id client_id = var.oidc_client_id name = var.oidc_client_name enabled = true access_type = var.oidc_client_access_type valid_redirect_uris = var.oidc_client_valid_redirect_urls login_theme = "keycloak" standard_flow_enabled = true direct_access_grants_enabled = true client_secret = random_password.openid_client_secret.result frontchannel_logout_enabled = true backchannel_logout_session_required = true pkce_code_challenge_method = "S256" } resource "keycloak_openid_client_default_scopes" "openid_client_default_scopes" { realm_id = keycloak_realm.default.id client_id = keycloak_openid_client.personal.id default_scopes = concat( var.oidc_client_default_scopes, [keycloak_openid_client_scope.groups.name] ) } resource "keycloak_openid_client_scope" "groups" { realm_id = keycloak_realm.default.id name = "groups" include_in_token_scope = true gui_order = 1 } - With all the above definitions in place. Let's go ahead and deploy it. Run the following from inside the directory.
terraform init
terraform fmt .
terraform plan --out plan.txt
terraform apply plan.txt
And that's it. Once your terraform deployment completes you should have a personal OIDC client that you use to secure your applications.
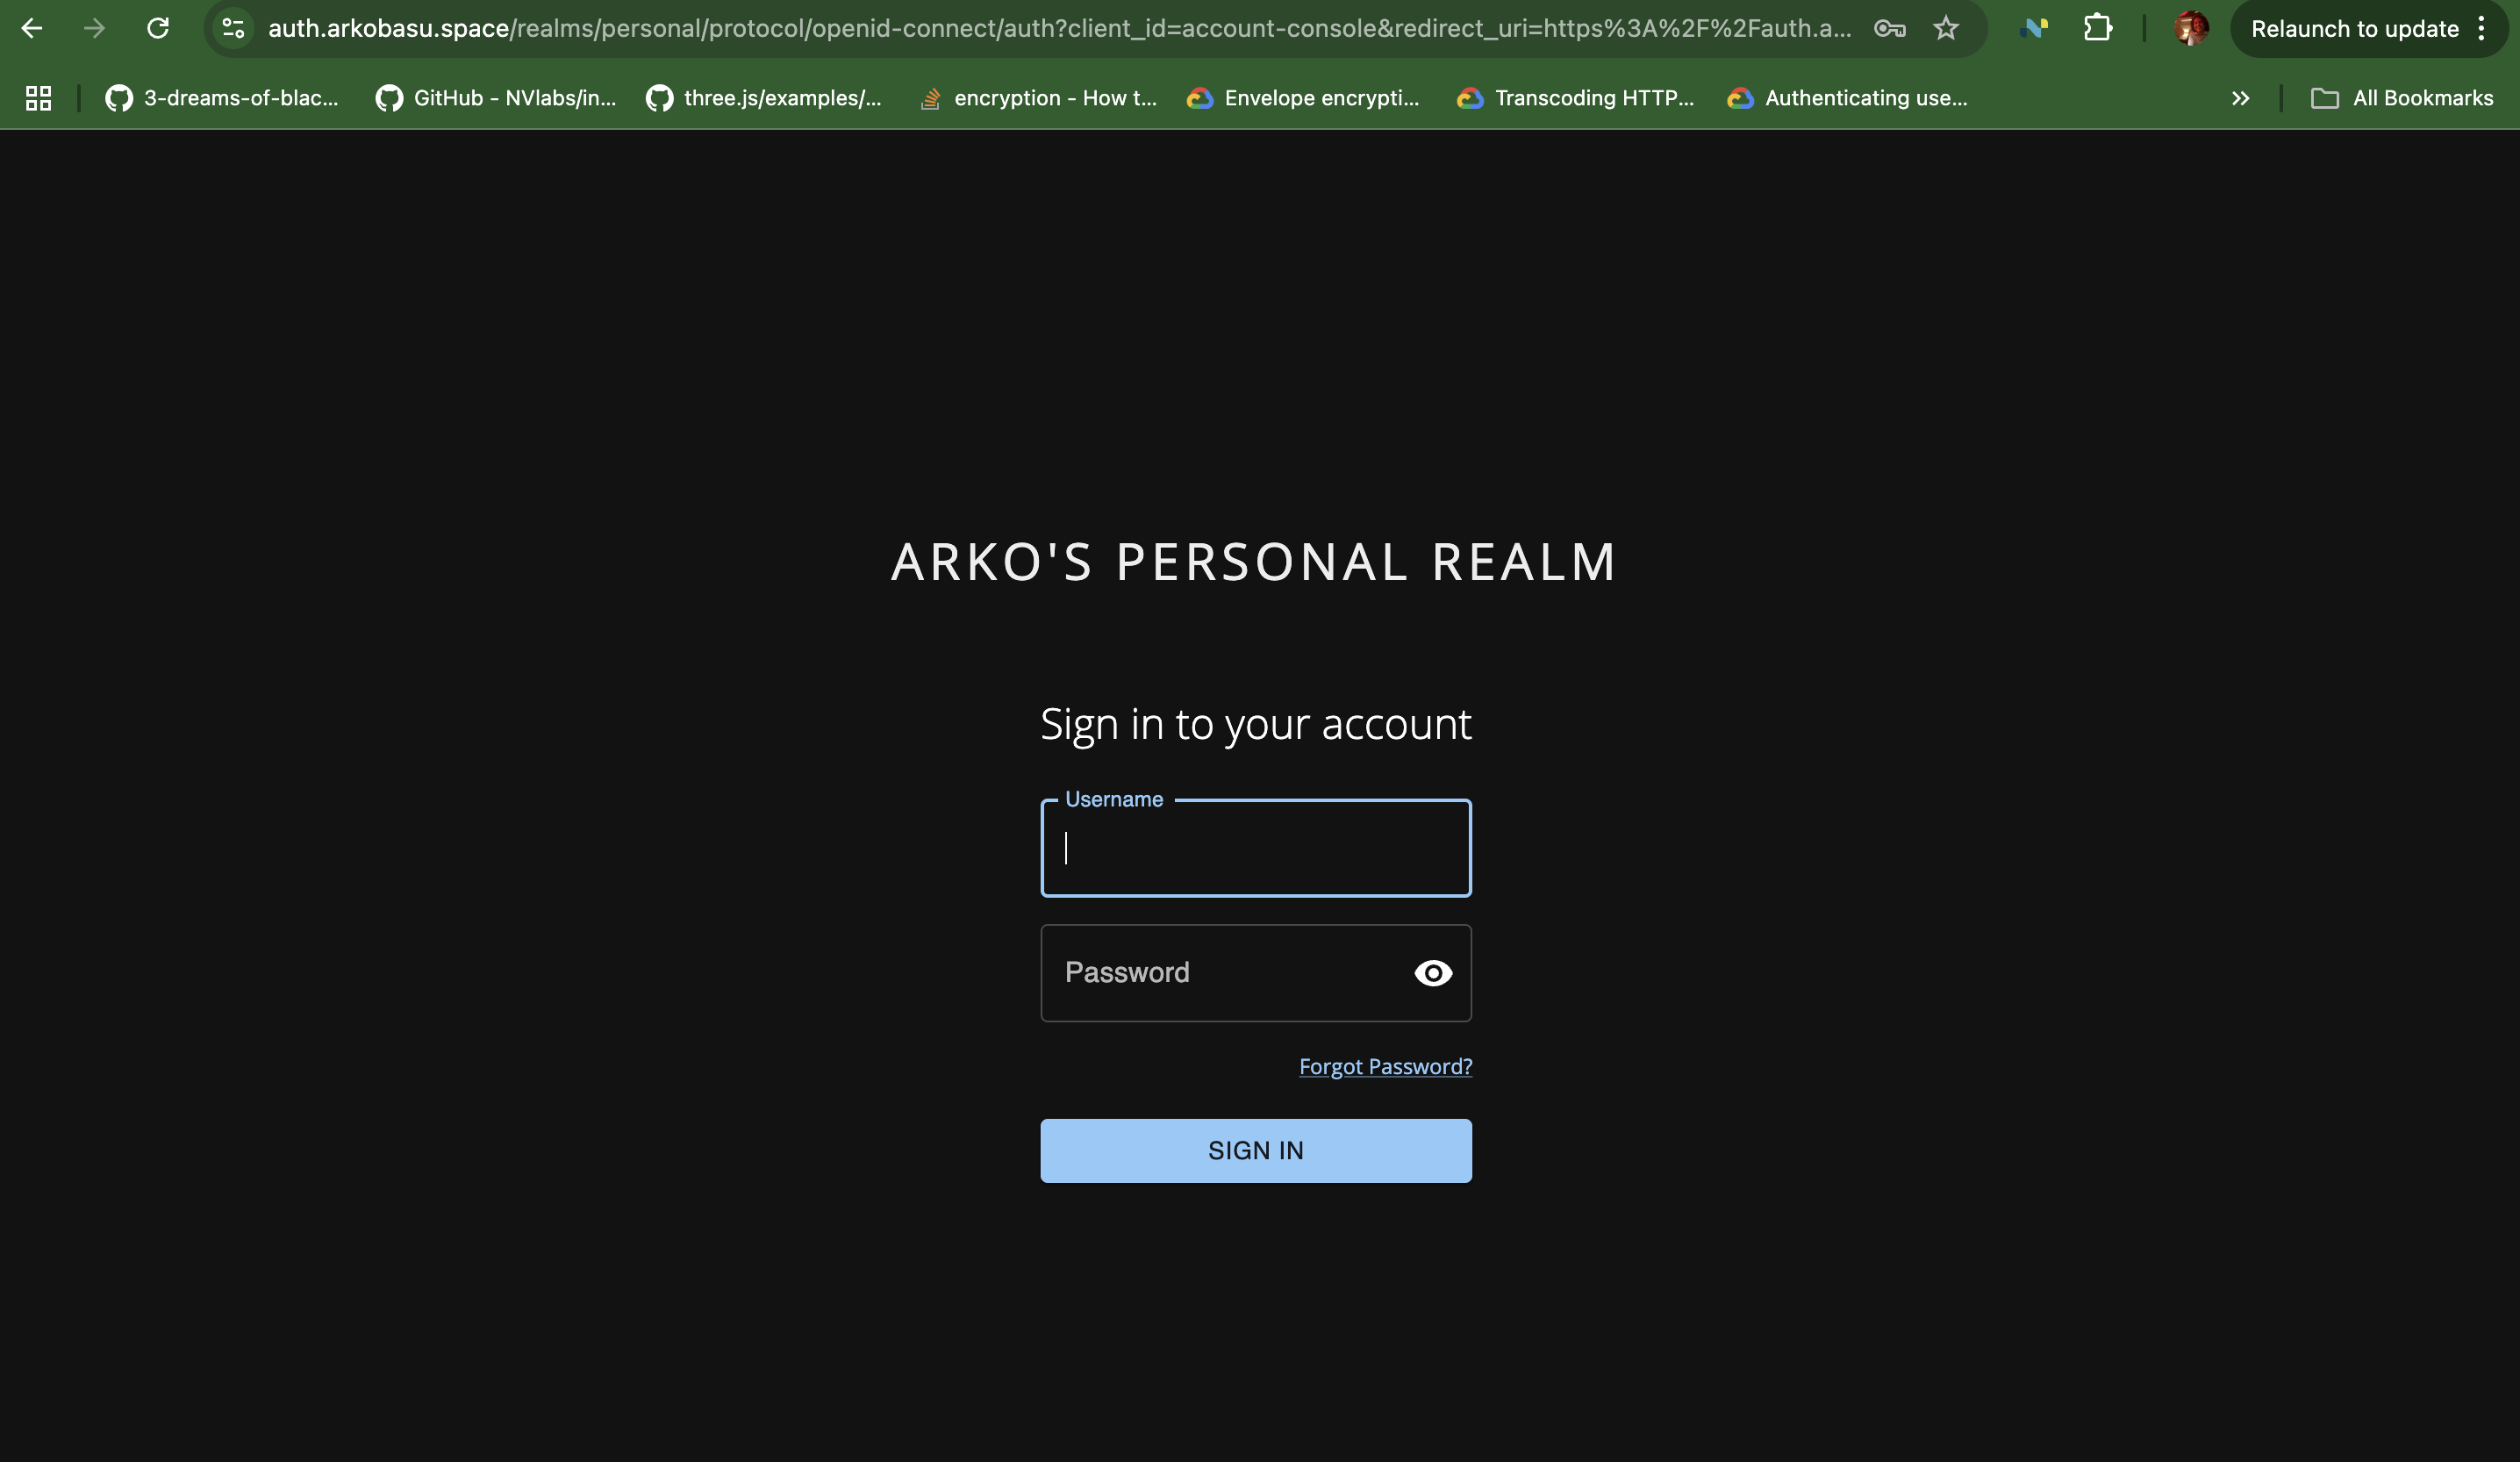
This custom OIDC client is created in a custom realm. It uses a custom-theme, that is publicly available in a S3 bucket hosted in my Ceph Cluster. Feel free to use it if you'd like.
Conclusion
In this blog, we have walked through the process of setting up a self-hosted OIDC client using Keycloak, ensuring full support for the OAuth 2.0 protocol. By leveraging Terraform, we've automated the deployment and configuration, making it easier to manage authentication in a scalable and reproducible way.
This setup not only provides a secure method for handling authentication but also serves as a template for managing a Keycloak realm, users, and custom roles from a DevOps perspective. With infrastructure as code, you can easily apply changes, enforce consistency across environments, and integrate authentication seamlessly into your applications.
By self-hosting your OIDC client, you gain complete control over identity and access management, reducing reliance on external providers while enhancing security and flexibility. Whether you're securing internal tools or external-facing applications, this approach ensures a robust and maintainable authentication system.
Now that you have a working OIDC setup with Keycloak and Terraform, you can further extend it by integrating multi-factor authentication (MFA), fine-tuning role-based access control (RBAC), or even automating Keycloak backups. The possibilities are endless—so start securing your applications with confidence! 🚀
References